|
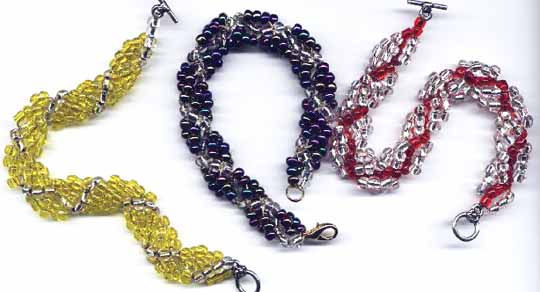
Seed Bead Bracelet in a Spiral Rope PatternKids Class 4
Materials ListTo make this seed bead bracelet in the spiral rope pattern, each student will need: A Needle Thread: Nymo D, Silamide, or similar beading thread 6/0 seed beads: My class used mostly Taiwanese beads purchased from General Bead. The bracelet requires 2 colors of beads, using less the 1 tablespoon of the color that will be on the outside of the spiral and less than 1 tablespoon of a second color that will be the core of the rope. A clasp Printed instructions may be helpful. Some kids will follow them on their own, and others may be able to use printed instructions to repeat the project later at home. If you are teaching youth groups of any kind, you are welcome to print out the entire webpage with spiral rope instructions as well as the page with instructions for attaching a clasp for your students. Please keep the web page location and the copyright line on your printed instructions. Tools and Teaching MaterialsSample seed bead bracelet in a spiral rope pattern Scissors Glue to use on knots Samples of the next project PreparationI pre-packaged size 6/0 seed beads with one tablespoon of beads for the outside of the spiral in one bag and one teaspoon for the core of the spiral in another bag. Not surprisingly, some of the girls really, really wanted some color for the outside of their spiral that was only available in the smaller bags. . . . I might have done just as well bringing a lot of bigger baggies of beads and just letting them measure out the proper amounts of two colors of their choice, although I have no doubt that the mess would have been larger. . . . I only provided a single color of thread, a tan color. If I were teaching this class today, I might have used one of the braided fishing lines, although the tangling thread problems might have been worse than they were. The ClassThis was the most complex construction we had done so far, so it was an interesting class. After the girls looked at the sample bracelets and picked out their colors, we started in unison, picking up four core beads and three outside beads and going back through the core beads. I then checked everyone's work to make sure things were going in the right directions. Then we did a couple more rows like that, as a group, before girls started to work independently. The youngest girl in the class caught on to the pattern first and was a great help getting all the girls at her table off to a good start. I don't know what I would have done without her! I spent most of the class hour untangling threads that had tied themselves in knots, threading needles, and correcting errors if they were not far back in the bracelet. I really could have used an assistant for a class of this size (16 girls). By the end of the hour, a lot of the girls had finished their bracelets, a couple had given up entirely, and a few were still working away at the seed bead bracelet. After we swept the beads off the floor, I showed them the
Treasure Fringe Pins
we would make in Class 5.
Return from Seed Bead Bracelet to Kids Projects List
|

