|
Beading Art with Seed Beads:Make A Bead Embroidery PictureBead Embroidery 101
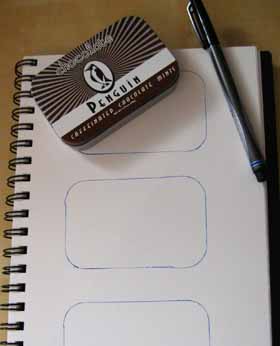
Let's look at beading art with seed beads. People who are already making lovely jewelry with seed beads sometimes get stuck at the point of selecting a subject for bead art and then figuring out how to go from idea to finished image. It's time to take the leap. In this exercise, we are going to create a simple still-life drawing, then turn it into a piece of beadwork. There are a couple of goals in this exercise. The first is to take the leap of faith and invest your time and beads in a simple drawing you have created yourself. The second is to begin developing an eye for where to change colors when you are beading on a drawing. Beading art with seed beads in this fashion will produce something like a Navaho blanket, a picture with somewhat squared off edges and a nice quality of a traditional craft. 1. Set up an extremely simple still life, such as a couple of bowls and a vase. Three objects with simple lines would make a good still life in the scale we are talking about here. 2. Decide on the finished size of your beadwork. You might consider making this the size to fit on top of a mints tin, say about 2.2" by 3.7". If you are using a mint tin, turn over the tin and trace around it to make several tracings on your drawing paper. This gives you several frames that you can fill with drawings.
4. Select your favorite drawing. It might be a very properly proportioned drawing or it may have more of the verve that is seen in kindergarten drawings. Either way, or anything in between is fine as long as you are reasonably pleased with it. If you can't satisfy yourself with one of your drawings, try taking a photo of your still-life, printing it to a suitable size, and simply tracing the edges. Then you just have to decide which portion of the drawing to include in your beadwork. Since you are using your own original photo to make your own original tracing, this is your own original piece of beading art with seed beads! If the lines on your drawing are pretty thin or faint, go over them with a Sharpie or similar marker to make them easy to see later. (If you worry about messing up as you do this step, it's fine to do the marker lines on a photocopy of your original.)
6. Use colored pencils, markers, or paint to color in the areas of your drawing. Use colors that are fairly similar to your bead colors; exact matches are unlikely and unnecessary. You want the colors to do two things: make it easy for you to remember what bead goes where, and make any bare spot in the beadwork hard to notice.
If you think your drawing may cause trouble under heat, consider scanning the drawing and printing out a copy in color. I do that a lot of the time, usually because I've changed my mind about the size I want. Anyway, the color print should work fine with your iron. Use a piece of paper over the top of your drawing when you iron the backing to the back; this protects your ironing board from the drawing and protects your drawing from anything on the ironing board.
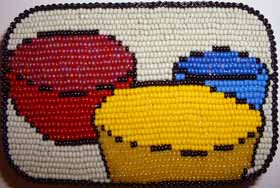
If there's an empty space, I'll see if I can fill it without creating more problems than I am solving. Remember, this is why you colored your paper, so there are not glaring white spaces showing between beads or between rows. 10. Trim your background fabric and paper as close to the edge as possible without cutting threads. If you are worried about the whole thing falling apart because you might accidentally cut a thread, you may want to coat the entire thread-covered back of your embroidery with a thin layer of glue, letting it dry before you trim the edges. It won't totally prevent accidents, but it will limit their potential for chaos. 11. Glue the trimmed and finished piece to the top of your tin. Don't worry if the edges are not perfectly neat. We can hide them! 12. When the top is dry, decide if you want to hide the edges with a narrow strip of peyote or another stitch, or you could use a ribbon, or simply glue on a couple of strands of seed beads. I used a six-bead wide row of peyote done with Japanese size 11 seed beads. I laced up the back, attaching the two ends of the strip once I had it glued in place and while the glue was still wet. 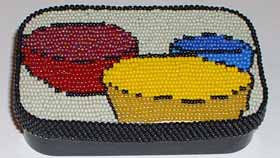
Special NotesYou may wish to paint your tin before you glue the beading in place. Spray paint is one easy choice, or consider using the enamel sold in hobby shops for painting models. It comes in very small bottles and makes less mess that spray paint. Testor is the brand I find in my area; I don't know if there are others. Be sure to buy a little bottle of the thinner so you can clean up your brush (and your hands, if you are like me and make a small mess while painting.) You may want to cover the bottom of the tin with a piece of felt, suede, or even paper to hide any printing there. If you are gluing something to the hinged side of your tin, make sure you are not also preventing the box from opening. Open and close the tin a few times as you observe the clearances needed for opening. On my piece, I did not embroider the black border as part of the embroidered picture. Instead, I beaded my other colors all the way to the edge. The black border was added with a strip of peyote after the beadwork was mounted on the top of the tin. And Another Note. . . .I've been looking at the finished piece of beadwork shown above and I think I would have gotten nicer black outlines if I had run the lines of beads up and down rather than side to side. In this particular drawing, the lines run more horizontal than vertical and I could have captured that better with beads placed in the other direction. Oh, well. . . . We live and we learn. At least the idea is that we live and learn, rather than just repeating the same stuff over and over again. . . . Show Us Your Own Bead Embroidered PictureYou can show us your results, so we can all learn from each other. Whether it's a piece you just did because of what you read here, or if it is something you did in the past that fits into this discussion, please consider sharing it. From Beading Art with Seed Beads (Embroidery 101) to Bead University
|

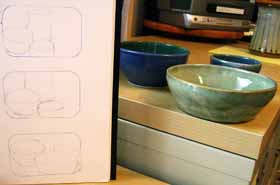 3. Outline your objects in a simple drawing. We're just doing simple outlines here. Try out various versions of how much to include in the frame.
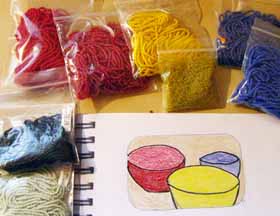 5. Select bead colors for your project (plus black for the outlines). I suggest size 11/0 Czech or Japanese seed beads for beading art with seed beads in this way, but because we will be embroidering in straight lines for this project, delicas or other cylinder beads will also be okay. It is fine to use smaller beads if you wish, but if you are making your piece the size of a mint tin, you can't really use larger beads. You will want all your beads to be the same diameter, or close to it, so try to avoid mixing bead types if you can. You will choose one color for each outlined area, one or two colors for the background, and use black for outlines.
 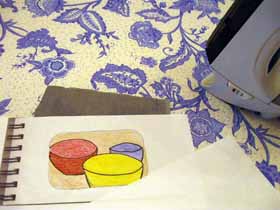 Because you will be ironing your drawing to a backing, it needs to be fairly heat resistant. You should be aware that regular colored pencils are wax-based, so they may melt at the heat of an iron. I just ran a little test with a prismacolor pencil drawing and an iron at medium heat and had no problems, but your results may differ.
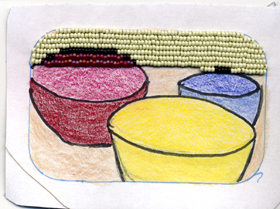 7. Start at the top of your drawing and begin beading across the surface from left to right. You can see
