|
Bead Embroidery BasicsBead Embroidery 100Bead embroidery is the easiest way I have found to translate a photo or other picture into bead art. One simple stitch (the back stitch) is all you need; a few easy tips and variations make it pretty easy to get the beads to stay where you want them. Preparing Your ArtworkFor photos, I usually use Photoshop Elements to simplify the colors, and sometimes to morph the colors into a different color range. The “Posterize” setting in Photoshop Elements (or similar settings in other graphics software) lets you select the number of colors to use. I start with some reasonable number, say 12 or so, and if the picture still looks good to me at that setting, I keep reducing the number of colors until it is no longer pleasing, then go back up to the last pleasing setting. Graphics software, of course, has a world of color available. Beads, alas, do NOT come in the same profusion of color. That’s why I am always looking at my screen and asking myself if I can really find beads in or near the colors I’m seeing on my monitor. Lots of graphics software lets you manipulate the color, increasing the blue, for example, or toning down the reds. I play with the colors, looking for a combination that depicts my subject in an interesting way and that is available in seed beads, especially in beads whose colors I expect to be permanent. This pretty much rules out the bright purples and vibrant pinks.
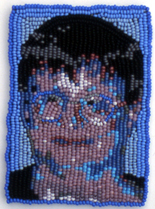
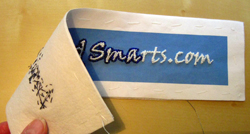
In the self-portrait above, I went toward the blues to get a workable and satisfying combination.You could, of course, work as the pointillist painters did, and create any color out of a very basic palette of colors, but the scale involved could get pretty big pretty fast! I like to make portraits only as big as they need to be to convey the essential sense of the subject. Since I have already put the photo or drawing into my graphics software, I can easily try printing it out in more than one size to study with beads in hand. I pay attention to the area of the picture in which detail is most important. Often it is the eyes in a portrait. For my own style of working, I am happy to use size 15 beads in the high-detail areas, while doing the bulk of the picture in size 11 beads. The size 15s are also handy to smooth out an edge on a curve, or fill in other small spots, so I tend to work with both sizes in my own bead embroidery. Preparing the Surface for Bead EmbroideryI print out my picture on a high resolution setting, so I get fully saturated colors. I prefer to print on a thinner paper stock, rather than photo paper or card stock. Once my picture is VERY dry, I use a dry iron to iron woven interfacing onto the back. Non-woven interfacing has also worked for me, but NOT the very lightweight non-woven stuff. My goal is to have a surface that is easy to push the needle through but tough enough that if I have taken a very tiny stitch on the back of the assembly, I won’t easily tear it out when I pull the needle back to the front of the assembly. I am also hoping for as thin a backing as possible, so I don’t have an edge that I have to cover up later. In making the title bar for this website, I started printing white type against a plain blue background. I ironed on some lightweight non-woven interfacing, which was not sturdy enough for my somewhat enthusiastic stitching, so then I had to baste a piece of heavier interfacing to the back..
You can also see from this photo that I started beading the title by embroidering the letters, using several sizes of seed beads to reflect the thick-and-thin line quality of the font I had chosen. Then I outlined the letters with size 15 beads, going for a good contrast with the white lettering. Start Beading in Back Stitch
I start my bead embroidery by tying a small knot in my thread and putting it through the backing only, making a couple of small stitches there to hold the end nicely in place. Then I bring the needle up at the place I have chosen to begin and put on anywhere from 1 to 8 beads, depending on the size of the beads and how long an initial line I want to make. If the line I’m making has a gentle curve, I nudge the beads into position before taking the needle back down through the picture at the very end of the last bead. For a straight line, I’ll bring the needle back up at the center of my line of beads and bring the needle through the last half of the beads, then add the new beads in that line. For size 11 beads going in a straight line, I most often put on four beads at a time and then come back up to go through the last two again. If a line is curving, I will do my back stitch “intervention” at the point where the curve is taking shape, so I can pull the straight line over to the place where I want it. Beading Direction in Seed Bead EmbroiderySome artists beads in straight lines. Take a look at the incredible bead embroidery done by Marcus Amerman. He follows lines straight across or straight up and down a picture. Often, different large sections of the picture will have different directions. You can see some of his work here. Amy Clarke Moore picks a focal point in her picture and begins a spiral there which fills the entire field. You can see some of her work here. I begin my own bead embroidery work where I want the most detail and work from there. I have moved in the direction of more discipline in regard to the direction of the rows of beads, and it is an area I am continuing to explore. Being Smart About DirectionThere’s no need for all of us to learn this lesson about bead embroidery the hard way. . . . Beads at the outside edges of a picture will tend to roll away or fall away from the center, because there is not another row there to hold them up. If you are not going to enclose the edge in a mat or other raised edge, you will find that your beads will behave much better at the edge if the row runs ALONG the edge, rather then running up to the edge and stopping. Or not quite stopping, as the outside bead falls over on its side, like a stale and lonely bagel put out for the pigeons to eat. . . . You CAN hold the beads up by sewing them to each other, but this puts extra thread up where everyone can see it, kinda the beady version of a dangling bra strap. . . .
Return from Bead Embroidery to Seed Bead University
|


